

Building a Rock Paper Scissors Game Using Socket

Unlike HTTP requests which are one-sided, Socket is a software structure that provides two way communication link between two nodes. Sockets are primarily used whenever realtime communication needs to be established.
For instance, chat applications, realtime databases, and online multiplayer games, all use Socket under the hood. One popular example is WhatsApp, the text messaging app that uses Socket for its realtime messaging service.
Introduction
This article focuses on building a web application that lets you play Rock, Paper, Scissors online with your friends. A player has to create a room and share the unique Room ID with the other player. The other player can join the same room with this unique Room ID. Once both players have joined the room, they could start playing!
There are two parts to this application,
- Front-end: To keep things simple, the front-end is built on basic HTML, CSS and JS with jQuery.
- Back-end: An Express server that uses Socket.io.
Prerequisites
- HTML is the standard markup language for web page. Here's a useful guide for beginners.
- CSS is a style sheet language for improving the presentation of web pages. To learn more, check this article.
- Bootstrap is a popular HTML, CSS and JS library. Here's an article to get you started.
- jQuery is a fast and feature-rich JavaScript library.
- Express.js is a web application framework for Node.js. Here's an introductory article on Express.js: link.
- Socket.io is a JavaScript library that abstracts WebSocket connections thereby enabling realtime, bi-directional communication. Here's a helpful article to get started. This article covers the usage of Socket.io on both the server and client-side. These are essential to follow along smoothly.
Starter code
In the interest of time and the intention to put more focus on Socket logic, please download the starter code from this repository on GitHub. Follow the instructions as mentioned on the README.md to set up the project on your local system.
If you're just looking for the source code, check out the final branch of the repository.
Here's a description of the files in the starter code repository:
public/index.html: A homepage for the app with all the required UI Components.public/style.css: Styles for the entire application.public/game.js: A client-side JavaScript file to handle events.app.js: A server-side Node.js file for setting up the server.
The app won't work yet. We still need to write the necessary logic to make the app function. Feel free to tweak the boiler-plate code to match your style.
There are two important files to focus on. One is app.js that handles server-side logic and the other is public/game.js that handles client-side logic.
Game flow
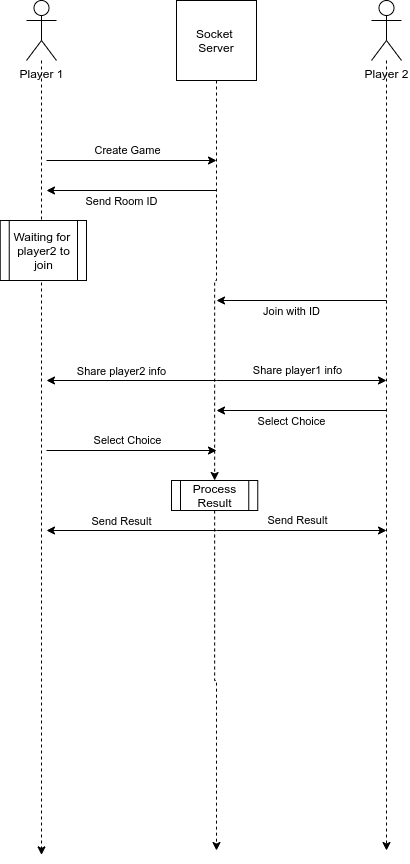
This is a sequence diagram that shows the timeline of events. It's important to understand the flow before we start coding so make sure you understand the diagram completely.
Read through the points below if you are not familiar with Sequence Diagrams.
- Time flows downward.
- Arrows represent events. The start of an arrow denotes the Emitter, the end of an arrow denotes the listener. For example, Player1 emits the
Create GameEvent and the Socket Server listens to this event. - A rectangular box denotes waiting/processing time.
First, Player1 emits the create Game Event that the server acknowledges and responds back with a room ID.
Once, player2 emits join Game Event with the same room ID, the server then detects that both players have joined the room and shares the other player's info with each other.
Finally, once both of the players have made their choice, the server processes the result and sends it back to both players.
Now that the flow is clear, let's jump right into coding.
Create game
Let's start by writing the logic for the Create Game Event in the public/game.js file.
//Create Game Event Emitter
$(".createBtn").click(function(){
    firstPlayer=true;
    const playerName=$("input[name=p1name").val();
    socket.emit('createGame',{name:playerName});
})
The code above listens for a click event on the Create Button. Once that event is triggered, the client grabs player1's name and emits a socket event named createGame. The variable firstPlayer identifies the player who started the game. The use of this variable will be explained later.
Next, we will write the server-side code in app.js so that the server listens to this event.
io.on("connection",(socket)=>{
    console.log("connection established");

    //Create Game Listener
    socket.on("createGame",(data)=>{
        const roomID=randomstring.generate({length: 4});
        socket.join(roomID);
        players[roomID]=data.name;
        socket.emit("newGame",{roomID:roomID});
    })

})
All event listeners/emitters go inside the io.on block as shown above. connection is the default event listener provided by Socket.io and a connection event is emitted under the hood every time a connection is established.
The CreateGame listener creates a new Room with a random Room ID and adds the client to that room. Later, the server emits an event newGame that contains the roomID for the created room.
The code below goes into public/game.js.
//New Game Created Listener
socket.on("newGame",(data)=>{
    $(".newRoom").hide();
    $(".joinRoom").hide();
    $("#message").html("Waiting for player 2, room ID is "+data.roomID).show();
    roomID=data.roomID;
})
This snippet lets player1 know that a room was created and player2 could use this roomID to join the room. Then, it hides the Room elements and displays a message with Room ID.
Join game
Next, we write client-side logic on public/game.js to emit the joinGame event.
//Join Game Event Emitter
$(".joinBtn").click(function(){
    const playerName=$("input[name=p2name").val();
    roomID=$("input[name=roomID").val();
    socket.emit('joinGame',{
        name:playerName,
        roomID:roomID
    });
})
The client emits joinGame event with player2's name and room ID, which we acquired from the input fields.
Next, we write server-side logic on app.js to listen to the joinGame event and share each other's info with the players.
//Join Game Listener
    socket.on("joinGame",(data)=>{
        socket.join(data.roomID);
        socket.to(data.roomID).emit("player2Joined",{p2name: data.name,p1name:players[data.roomID]});
        socket.emit("player1Joined",{p2name:players[data.roomID],p1name:data.name});
    })
First, the code above adds player2 to the room and then it notifies player2 with player1's info and player1 with player2's info.
The following code goes into public/game.js.
//Player 2 Joined
socket.on("player2Joined",(data)=>{
    transition(data);
  })

//Player 1 Joined
socket.on("player1Joined",(data)=>{
    transition(data);
})

const transition=(data)=>{
    $(".newRoom").hide();
    $(".joinRoom").hide();
    $(".leaderboard").show();
    $(".controls").show();
    $(".player1 .name").html(data.p1name);
    $(".player2 .name").html(data.p2name);
    $("#message").html(data.p2name+" is here!").show();
}
The code above calls the transition() function for both players. This transition() function takes care of all the UI changes to enter the game.
Players select choice
Next, we add the logic needed for the client to be able to select a choice and emit events in the public/game.js file.
//Select Choice
$(".controls button").click(function (){
    const choice=$(this).html().trim();
    const choiceEvent=firstPlayer?"choice1":"choice2";
    socket.emit(choiceEvent,{
        choice: choice,
        roomID:roomID
    });
})
The code above gets the choice picked by the user and emits the choice Event. The firstPlayer variable is used to distinguish between the kind of event the player has to emit. Player1 emits choice1, Player2 emits choice2 .
Listen to player's choice
We add server-side side logic at app.js to listen to Player1's choice.
//Listener to Player 1's Choice
    socket.on("choice1", (data)=> {
        choice1 = data.choice;
        console.log(choice1, choice2);
        if (choice2 != "") {
            result(data.roomID);
        }
    });
The code above gets player1's choice and does nothing if player2 hasn't picked their choice yet.
Next, we write the logic to listen to player2's choice in app.js.
//Listener to Player 2's Choice
    socket.on("choice2", (data)=> {
        choice2 = data.choice;
        console.log(choice1, choice2);
        if (choice1 != "") {
            result(data.roomID);
        }
    });
Once, both players have picked their choice, the server enters into the if block and invokes the result() function.
Declare winner
In app.js include snippet below:
//Function to be executed after getting both choices
const result=(roomID)=> {
    var winner = getWinner(choice1, choice2);
    io.sockets.to(roomID).emit("result", {
        winner: winner
    });
    choice1 = "";
    choice2 = "";
}
The result function takes the roomID as an argument.
First, the getWinner() function calculates the result based on the player's choices . Next, it emits the result to all the clients in the room, i.e. both player1 and player2.
Finally, it resets the player's choices.
Note:
getWinner()is already included in the boiler code.
Listen to the result
We now have the server emitting the result to both the players. It's time to write client-side logic at public/game.js to listen to the result event.
//Result Event Listener
socket.on("result",(data)=>{
    if(data.winner=="draw"){
        $("#message").html("It's a draw!");
    }else{
        updateDOM(firstPlayer==data.winner?"player1":"player2");
    }
})

const updateDOM=(player)=>{
    const playerDOM=$("."+player+" span");
    const prevScore=parseInt(playerDOM.html().trim());
    playerDOM.html(prevScore+1);
    const winnerName=$("."+player+" .name").html().trim();
    $("#message").html(winnerName+" scored a point!");
}
The code above listens to the result event and updates the DOM with the help of the updateDOM() function. The updateDOM() function announces the winner and increases the score of the winner.
In case of a draw, we will display a message that says: "It's a draw".
Conclusion
The final version of public/game.js is:
const socket = io.connect("http://localhost:4000");

let firstPlayer=false;
let roomID;

//Create Game Event Emitter
$(".createBtn").click(function(){
    firstPlayer=true;
    const playerName=$("input[name=p1name").val();
    socket.emit('createGame',{name:playerName});
})

//New Game Created Listener
socket.on("newGame",(data)=>{
    $(".newRoom").hide();
    $(".joinRoom").hide();
    $("#message").html("Waiting for player 2, room ID is "+data.roomID).show();
    roomID=data.roomID;
})

//Join Game Event Emitter
$(".joinBtn").click(function(){
    const playerName=$("input[name=p2name").val();
    roomID=$("input[name=roomID").val();
    socket.emit('joinGame',{
        name:playerName,
        roomID:roomID
    });
})

//Player 2 Joined
socket.on("player2Joined",(data)=>{
    transition(data);
  })

//Player 1 Joined
socket.on("player1Joined",(data)=>{
    transition(data);
})

const transition=(data)=>{
    $(".newRoom").hide();
    $(".joinRoom").hide();
    $(".leaderboard").show();
    $(".controls").show();
    $(".player1 .name").html(data.p1name);
    $(".player2 .name").html(data.p2name);
    $("#message").html(data.p2name+" is here!").show();
}

//Select Choice
$(".controls button").click(function (){
    const choice=$(this).html().trim();
    const choiceEvent=firstPlayer?"choice1":"choice2";
    socket.emit(choiceEvent,{
        choice: choice,
        roomID:roomID
    });
})

//Result Event Listener
socket.on("result",(data)=>{
    if(data.winner=="draw"){
        $("#message").html("It's a draw!");
    }else{
        updateDOM(firstPlayer==data.winner?"player1":"player2");
    }
})

const updateDOM=(player)=>{
    const playerDOM=$("."+player+" span");
    const prevScore=parseInt(playerDOM.html().trim());
    playerDOM.html(prevScore+1);
    const winnerName=$("."+player+" .name").html().trim();
    $("#message").html(winnerName+" scored a point!");
}
The final version of app.js is:
const app = require('express');
const socket = require('socket.io');
const randomstring = require('randomstring');

const express = app();

const server=express.listen(4000,()=>{
    console.log("server started at http://localhost:4000");
})

express.use(app.static('public'));

const io=socket(server);

//ALL player info
let players={};

//GAME VARIABLES
let choice1="",choice2="";

io.on("connection",(socket)=>{
    console.log("connection established");

    //Create Game Listener
    socket.on("createGame",(data)=>{
        const roomID=randomstring.generate({length: 4});
        socket.join(roomID);
        players[roomID]=data.name;
        socket.emit("newGame",{roomID:roomID});
    })

    //Join Game Listener
    socket.on("joinGame",(data)=>{
        socket.join(data.roomID);
        socket.to(data.roomID).emit("player2Joined",{p2name: data.name,p1name:players[data.roomID]});
        socket.emit("player1Joined",{p2name:players[data.roomID],p1name:data.name});
    })

    //Listener to Player 1's Choice
    socket.on("choice1", (data)=> {
        choice1 = data.choice;
        console.log(choice1, choice2);
        if (choice2 != "") {
            result(data.roomID);
        }
    });

    //Listener to Player 2's Choice
    socket.on("choice2", (data)=> {
        choice2 = data.choice;
        console.log(choice1, choice2);
        if (choice1 != "") {
            result(data.roomID);
        }
    });

    //Function to be executed after getting both choices
    const result=(roomID)=> {
        var winner = getWinner(choice1, choice2);
        io.sockets.to(roomID).emit("result", {
            winner: winner
        });
        choice1 = "";
        choice2 = "";
    }

})

//Function to calculate winner
const getWinner=(p, c)=>  {
    if (p === c) {
        return "draw";
    } else if (p === "Rock") {
        if (c === "Paper") {
            return false;
        } else {
            return true;
        }
    } else if (p === "Paper") {
        if (c === "Scissor") {
            return false;
        } else {
            return true;
        }
    } else if (p === "Scissor") {
        if (c === "Rock") {
            return false;
        } else {
            return true;
        }
    }
}
Kudos, You made it 🎉
If you are facing issues with the code, try a hard refresh (Ctrl+Shift+R) so that the JavaScript is updated and also compare your code with the final version to find any possible discrepancies.
Conclusion
Although the app works, it could be improved. As mentioned before, the intention was to keep this tutorial simple to put more focus on Socket logic. The next step is to improve the app by adding extra functionality, read along for some suggestions.
Next steps
- Refactoring the code.
- Error handling.
- Efficient usage of Events.
- Improving the UI.
- Storing choice details in socket meta-data rather than using server-side variable.
Check out my Rock, Paper, Scissor game for reference.
Here's the link to the Github repo. Feel free to try the game out at this link where its deployed to Heroku.
Thanks for reading.
Peer Review Contributions by: Louise Findlay

Cloudzilla is FREE for React and Node.js projects


