

Getting Started Using Admob to React Native Expo

Many modern-day apps contain ads in them. The ads may pop out if you want to use certain features in the app. Mainly in video game apps, you may need to watch an ad before reaching another level. Ads have been a popular way to monetize the app and make some profit out of it. Some sophisticated apps also provide a payment option to remove the ads from the interface. Here, we are going to incorporate the same logic but in a slightly different way.
In this tutorial, we are going to implement Admob in the React Native application. We are going to implement an interface to show the ads as well as an option to remove ads as well.
In most cases, the users will have to pay to remove the ads. But we are going to make users watch video ads to hide the ads from the interface for a certain amount of time. In order to this, we are going to make use of the expo Admob package that provides the ad reward feature.
Requirement
- Starter React Native project. (Check out the previous tutorial for a detailed guide on how to build the starter project).
- Android Emulator or Real Device
- Admob account
- Node.js
- VSCode or other text editor IDEs.
- Yarn
- Git SCM
let's get started!
STEP 1: Fetching Admob app ID
To incorporate the AdMob in the React Native app, first, we need to get the App ID for it. For that, we need to create an Admob account (if we have not done so yet) then go to the AdMob app dashboard as shown in the screenshot below:

From the dashboard, we need to create a new app. For that, we need to go to create a new Admob app console and select the required options as directed in the screenshot below:

After clicking on 'Continue', we need to fill the App name and subsequently click on the 'ADD APP' button as shown in the screenshot below:

Next, we need to add the Ad Unit as directed in the screenshot below:

The Admob console generally provides 5 types of ads to be integrated. For this tutorial, we are going to focus on banner ads and reward ads. The ad types to be selected are shown in the screenshot below:

First, we are going to create a Banner ad as directed in the screenshot below:

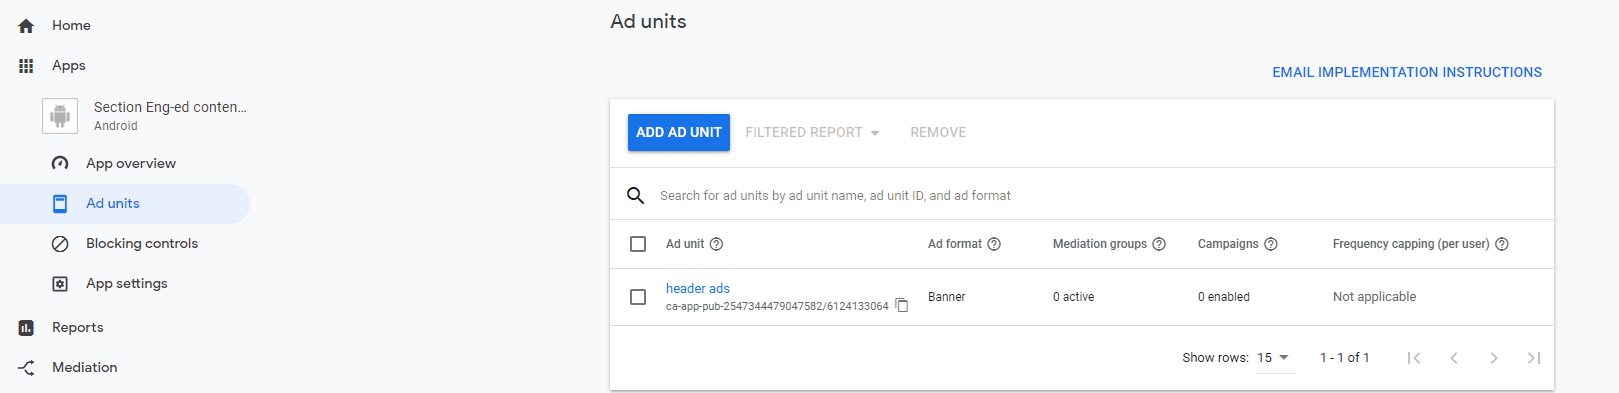
Here, we have named our Ad unit name as 'header ads'. Now after clicking on 'CREATE AD UNIT', we will receive an Ad Unit ID as shown in the screenshot below:

Now, we will be able to get the Ad Unit ID from the dashboard as well:
Next, we are going to repeat the same process and create a Reward Ad. We can customize the Ad Unit name and Amount as directed in the screenshot below:

After clicking on 'CREATE AD UNIT', we will get the Ad Unit ID for the Reward Ads as well. Now, we will be able to see two Ad units in our console:

STEP 2: Setup Admob on Expo
To set up Admob on Expo, we will need to export the previous project from the Expo snack. Due to the fact that we are not authorized to access the app.json to use in environment variables. Therefore, we need to export the entire expo project as directed in the screenshot below:

After exporting to the local system, we need to install all the required packages as mentioned in the requirement section above. First, we are going to install Expo CLI. We need to open the terminal in the project directory and run the following command:
yarn ; yarn global add expo-cli
Now that our expo-cli is installed, we need to start setting up Admod. For that, we need to open the app.json file and add the Admob App ID to the config section as shown in the code snippet below:
{
 "expo": {
    "android": {
      "adaptiveIcon": {
        "foregroundImage": "./assets/adaptive-icon.png",
        "backgroundColor": "#FFFFFF"
      },
      "config": {
        "googleMobileAdsAppId":"ca-app-pub-2547344479047582~7785850471"
      }
   },
},
Now, it is time to install the expo Admob package i.e. expo-ads-admob. For that, we need to run the following command in our project terminal:
expo install expo-ads-admob
After everything is installed, we can go ahead and run the app using the following command in the project terminal:
expo start
After this, we need to choose the required emulator, that is, Android to run the project on. Then on a successful build, we will get the app running in our emulator as shown in the screenshot below:

STEP 3: Using Admob Banner
Now, we are going to use the Banner Ad that we created before in Admob Account in our Home Screen. For that, we need to import the AdMobBanner component in the Home.js file as directed in the code snippet below:
import {
  AdMobBanner,
  setTestDeviceIDAsync
} from "expo-ads-admob";
AdMobBanner: The component that delivers the Banner Ad to the interface.setTestDeviceIDAsync: This module enables us to display ads in the test environment.
First, we are going to call the setTestDeviceIDAsync inside the useEffect hook so that it triggers every time the app loads. The coding implementation is provided in the code snippet below:
const Home = () => {
  React.useEffect(() => {
     setTestDeviceIDAsync("EMULATOR");
  }, []);
}
Next, we need to add the Banner ad to the view. For that, we are going to use the AdMobBanner component with props configured. It will be wrapped inside the Card component with styles as shown in the code snippet below:
<Card
  style={{
    shadowOffset: { width: 5, height: 5 },
    width: "90%",
    borderRadius: 5,
    alignSelf: "center",
    alignContent: "center",
    alignItems: "center",
    marginTop: 10,
    marginBottom: 10,
  }}
>
<AdMobBanner
    bannerSize="smartBanner"
    adUnitID="<-- Your Banner Ad Unit ID Here -->"
    servePersonalizedAds // true or false
    onDidFailToReceiveAdWithError={(e) => console.log(e)}
    />
</Card>
We can do a similar thing and add the Banner ad to the Setting screen as well.
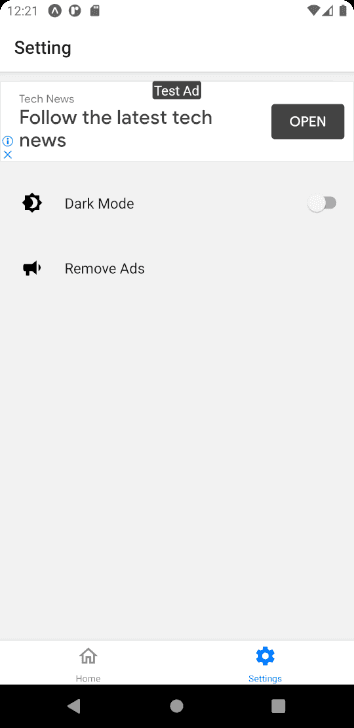
The resulting Banner ad on both the screens is demonstrated in the screenshot below:

As we can notice, we have rendered out the Banner ad at the top of the Home and Setting Screen. Now, we can move on to the Reward Ads.
STEP 4: Using Admob reward ads
The Admob reward ad is a video ad that forces users to watch a video to a certain length to obtain certain rewards. We can use it in multiple scenarios such as receiving game points, upgrading levels, etc.
We are going to integrate this Reward Ad into the Setting screen. For this, we need to import the AdMobRewarded component from the expo-ads-admob package as shown in the code snippet below:
import {
  AdMobBanner,
  AdMobRewarded,
  setTestDeviceIDAsync,
} from "expo-ads-admob";
Next, we need to create a new function to handle the Reward Ads. In the function, we need to set the Ad Unit ID, request, and show ads asynchronously. The overall configuration of the function is provided in the code snippet below:
const initRewardAds = async () => {
    // Display a rewarded ad
    await AdMobRewarded.setAdUnitID("<-- Your Reward Ad Unit ID Here -->");
    await AdMobRewarded.requestAdAsync();
    await AdMobRewarded.showAdAsync();
};
Now, we need to add a new setting screen option to remove ads. It's going to be a List element item with a bullhorn icon. The template for it is provided in the code snippet below:
<TouchableOpacity>
   <List.Item
      title="Remove Ads"
      left={() => <List.Icon icon="bullhorn" />}
   />
</TouchableOpacity>
We will get the Remove Ads list option as shown in the demo screenshot below:
Next, we are going to create a Modal component. It will be used to ask for the consent of the users to watch the video ads. For that, we need to import the required components as shown in the code snippet below:
import {
  View,
  TouchableOpacity,
  Text,
  Modal,
  StyleSheet,
  Alert,
} from "react-native";
import {
  Card,
  Title,
  Paragraph,
  Headline,
} from "react-native-paper";
First, we need to define a state using the useState hook to control the visibility of the Modal component as directed in the code snippet below:
export default ({ navigation }) => {
  const [modalVisible, setModalVisible] = useState(false);
/// other code
Next, we need to add a Modal component with a body template. In the Modal body, we are going to add a button to trigger the Reward Ads as well. The Modal component with its prop configuration along with body template is provided in the code snippet below:
<Modal
   animationType="slide"
   transparent={true}
   visible={modalVisible}
>
   <View style={styles.centeredView}>
      <View style={styles.modalView}>
        <Title style={styles.modalText}>
           Watch Video Ads for remove ads
        </Title>
        <TouchableOpacity style={{ ...styles.openButton, backgroundColor: "#2196F3" }}
              onPress={() => {
                initRewardAds();
              }}
        >
        <Text style={styles.textStyle}>Watch Ads</Text>
        </TouchableOpacity>
            <TouchableOpacity
              style={{ ...styles.openButton, backgroundColor: "#2196F3" }}
              onPress={() => {
                setModalVisible(false);
              }}
            >
            <Text style={styles.textStyle}>Nope</Text>
            </TouchableOpacity>
       </View>
   </View>
</Modal>
The required styles mentioned in the code snippet above is provided in the code snippet below:
const styles = StyleSheet.create({
  centeredView: {
    flex: 1,
    justifyContent: "center",
    alignItems: "center",
    marginTop: 22,
  },
  modalView: {
    margin: 20,
    backgroundColor: "white",
    borderRadius: 5,
    padding: 35,
    alignItems: "center",
    shadowColor: "#000",
    shadowOffset: {
      width: 0,
      height: 2,
    },
    shadowOpacity: 0.25,
    shadowRadius: 3.84,
    elevation: 5,
  },
  openButton: {
    backgroundColor: "#F194FF",
    borderRadius: 20,
    padding: 10,
    marginTop:10,
    elevation: 2,
  },
  textStyle: {
    color: "white",
    fontWeight: "bold",
    textAlign: "center",
  },
  modalText: {
    marginBottom: 15,
    textAlign: "center",
  },
});
You may find it difficult to implement a Modal in React Native. If that is the case, you can check out the official React Native documentation.
Lastly, we need to call the Modal trigger function to the Remove ads list option as directed in the code snippet below:
<TouchableOpacity
   onPress={() => {
      setModalVisible(true);
   }}
>
  <List.Item
     title="Remove Ads"
        left={() => <List.Icon icon="bullhorn" />}
   />
</TouchableOpacity>
If we click on the Remove Ads option, we will get the Modal with two options: Watch Video or Exit.
If we choose to watch the video ad then the video ad will play in the app as shown in the demo below:

Now that we have the video ads playing on the screen, we need to add a function called initRewardAds to handle the Reward ad event. Inside the function, we are going to trigger two events.
First, if the user views the video ad for 5 seconds, we will trigger rewardedVideoDidRewardUserevent and close all ads.
The second event triggers the rewardedVideoDidClose event and hide the modal itself.
The overall coding implementation of this function is provided in the code snippet below:
const initRewardAds = async () => {
    // Display a rewarded ad
    await AdMobRewarded.setAdUnitID("<-- Your Reward Ad Unit ID Here -->"); // Test ID, Replace with your-admob-unit-id
    await AdMobRewarded.requestAdAsync();

    AdMobRewarded.addEventListener("rewardedVideoDidRewardUser", () => {
      // trigger function for hide ads
    });
    AdMobRewarded.addEventListener("rewardedVideoDidClose", () => {
            // if we close ads modal will close too
      setModalVisible(false);
    });
    await AdMobRewarded.showAdAsync();
  };
STEP 5: Control Ads status across an app with Redux
To control the visibility of ads across every screen in the app, we are going to use the Redux mechanism. It is similar to the previous tutorial where we control the dark theme mode changes using Redux.
First, we need to define some constants in the constant.js file for a new ad status as directed in the code snippet below:
export const DARK_THEME = "DARK_THEME";
export const LIGHT_THEME = "LIGHT_THEME";

export const AD_ON = "AD_ON";
export const AD_OFF = "AD_OFF";
Next, we need to create a new reducer file named admob.reducer.js and add the code to toggle the ad status as shown in the code snippet below:
import { AD_OFF, AD_ON } from "../constant";
const initialState = {
  ad_status: true,
};
export default (ad_status = initialState, { type }) => {
  switch (type) {
    case AD_ON:
      return { ad_status: true };
    case AD_OFF:
      return { ad_status: false };
    default:
      return ad_status;
  }
};
Now, we need to register the new reducer to the root reducer inside the combineReducers module as shown in the code snippet below:
import { combineReducers } from "redux";

import themeReducer from "./theme.reducer";
import admobReducer from "./admob.reducer";
export default combineReducers({
  themeReducer,
  admobReducer,
});
Now, to trigger the reducer states, we need to create an action file named admob.action.js. Then add the action function to trigger the toggling of the ad status.
The required action implementation is provided in the code snippet below:
import { AD_OFF, AD_ON } from "../constant";
export const ToggleAdOn = () => ({
  type: AD_ON,
});
export const ToggleAdOff = () => ({
  type: AD_OFF,
});

export const ToggleAds = (ads_state) => {
  return async (dispatch) => {
    if (ads_state === true) {
      dispatch(ToggleAdOn());
    } else {
      dispatch(ToggleAdOff());
    }
  };
};
In order to use the reducer, we need to go to the Home.js file and import the useSelector hook to access the reducer state easily:
import { useSelector } from "react-redux";
const Home = () => {
 const admobReducer = useSelector((reduxStoreState) => state.admobReducer);
Next, we need to use the ad_status state from the reducer to conditionally render the AdMobBanner as directed in the code snippet below:
{admobReducer.ad_status && (
   <Card>
     <AdMobBanner
       /// other code
     />
   </Card>
)}
Now, we need to apply the same configuration to the Setting.js file as well. We need to import the action as well as useSelector and useDispatch hooks.
Then, initialize the hooks as shown in the code snippet below:
import * as admobActions from "../redux/actions/admob.action";
import { useDispatch, useSelector } from "react-redux";
export default ({ navigation }) => {
  const [modalVisible, setModalVisible] = useState(false);
  const dispatch = useDispatch();
  const admobReducer = useSelector((reduxStoreState) => state.admobReducer);
  /// other code
Then, we need to apply conditional rendering to the AdmobBanner component just like in the home screen as we can see in the code snippet below:
{admobReducer.ad_status && (
  <Card>
     <AdMobBanner
        /// other code
     />
   </Card>
)}
Now we need to trigger the toggling of ads status from action. For that, we need to dispatch the ToggleAds method. We can do that inside the callback of the rewardedVideoDidRewardUser event as shown in the code snippet below:
AdMobRewarded.addEventListener("rewardedVideoDidRewardUser", () => {
   dispatch(admobActions.ToggleAds(false));
});
The bottom line are ads that cannot be shipped until the video ads end. If we close the ad before the ad ends, we won't get the reward and the ads will still be shown.
The final result is demonstrated in the demo below:
We have successfully integrated the Admob Banner as well as the Admob Reward ad.
Conclusion
Monetizing an app using Admobs can be profitable in the long run as the app becomes popular. This tutorial demonstrated how to set up and configure Admob into a React Native app based on the Expo ecosystem.
The tutorial also shed light on creating the Admob account and fetching the Admob Unit ID.
This is essential when displaying Admob banners in a React Native app. Finally, the major learning point was how to control the visibility of ads using the Redux mechanism.
The overall code for this tutorial is available on GitHub.
Peer Review Contributions by: Mohan Raj

Cloudzilla is FREE for React and Node.js projects


